
Easy-to-Install In-Ground Trampoline Kits
The Jump Shack’s easy-to-install in-ground trampoline kits come in round and rectangular sizes starting at $2,135, with heavy-duty frames, a built-in retaining wall, vented safety pads and free shipping on every kit.
INSTALLATION GUIDE FOR IN-GROUND TRAMPOLINES
When you buy a Capital Play in-ground trampoline from The Jump Shack, you get a quality, user-friendly kit designed for simple assembly and a flush, ground-level installation.
If the job is too much to take on yourself, ask about our professional in-ground trampoline installation and contact us for a free estimate.
For more detailed step-by-step instructions, download the full PDF guide for your trampoline:
What to Know Before You Dig
Before jumping into the installation, here is a quick look at what our complete kits offer:
- Available Sizes: We carry shapes for every yard, from a 14ft round model to rectangular setups ranging from 11ft x 8ft up to a massive 17ft x 12ft.
- What’s Included: Every kit comes complete with the heavy-duty double frame, commercial-grade jump mat, springs, the built-in retaining wall system, and TDU vented safety pads.
- The “Easy Install” Factor: These systems are designed specifically for DIYers. The frame snaps together easily, attaches directly to the retaining wall, and requires no concrete pouring for a flush, seamless finish.
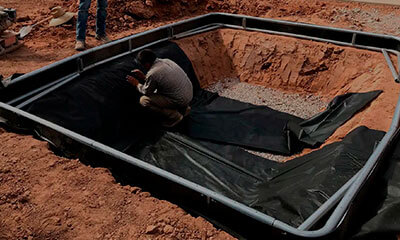
STEP 1. DIG THE HOLE
Before you break ground, call 811 to have buried utility lines marked. Then mark the hole: draw a line on the ground as your digging guide and make sure the hole is a few inches wider than the trampoline itself.
Check the chart below to find the size hole you should dig that is appropriate for the dimensions of your Capital Play in-ground trampoline.
Installation Tip: Leave Room to Back-Fill
Having a margin for error is important for even, flush placement of your in-ground trampoline. Dig an extra few inches around the diameter of the hole which will then be back-filled later on.


STEP 2. CONSTRUCT THE TRAMPOLINE FRAME
Put the trampoline together by first assembling the top and bottom sections of the frame, followed by the mat and springs. Then secure the frame to the retaining wall.
Installation Tip: Start With Four Springs
Attach springs at 3, 9, 12, and 6 o’clock positions first. This makes it easier to attach the following springs and ensures even tension.

STEP 3. PLACE TRAMPOLINE IN HOLE

When placing the trampoline onto the ledge, make sure the in-ground trampoline frame sits at the correct height to finish flush with the ground, then back-fill the gap. Planning your base and drainage? See what to put under an in-ground trampoline base.
Installation Tip: Pack the Soil Tight
Compact the soil easily with the handle of your shovel. Pack it down tight to avoid issues in the future.
STEP 4. SECURE VENTED PADS TO THE TRAMPOLINE
Once the measuring, digging and hard work are done, attach the TDU vented pads to the trampoline frame, and the fun on your new Capital Play in-ground trampoline can begin!
Installation Tip: Time to Jump
Jump and enjoy!

